Replacing brake pads on your sedan is a rewarding maintenance task that can save you hundreds at the shop while giving you peace of mind on the road. As a common wear item, pads typically last 30,000–70,000 miles depending on your driving style and conditions, but squealing, grinding noises, or a spongy pedal are your cues to act. This guide focuses on front brake replacement—the most frequent DIY job—for a typical sedan like a Honda Civic or Toyota Camry. It’s straightforward with basic tools, taking about 1–2 hours per side. Always consult your owner’s manual for model-specific torque specs, and if you’re uncomfortable with calipers or rotors, leave it to a pro to avoid safety risks.
Tools and Materials Needed
- New brake pads (ceramic or semi-metallic for sedans; match your vehicle’s make/model)
- Brake cleaner spray
- High-temperature brake grease or anti-seize compound
- Jack and jack stands (or ramps)
- Lug wrench or impact gun
- C-clamp or brake piston tool (for compressing pistons)
- Socket set (usually 14mm for caliper bolts; check manual)
- Torque wrench
- Wire brush or sandpaper (for cleaning)
- Gloves, safety glasses, and rags
Safety First: Preparation Steps
- Park on a flat surface, engage the parking brake, and chock the rear wheels for stability.
- Loosen the lug nuts on the wheel you’re working on (don’t remove yet) while the car is on the ground—this prevents the wheel from spinning mid-air.
- Jack up the front of the sedan using a frame rail or pinch weld (per manual), secure with jack stands, and remove the wheel.
- Repeat for the opposite side if doing both fronts at once, but work one side at a time to compare.
Step-by-Step Replacement Process
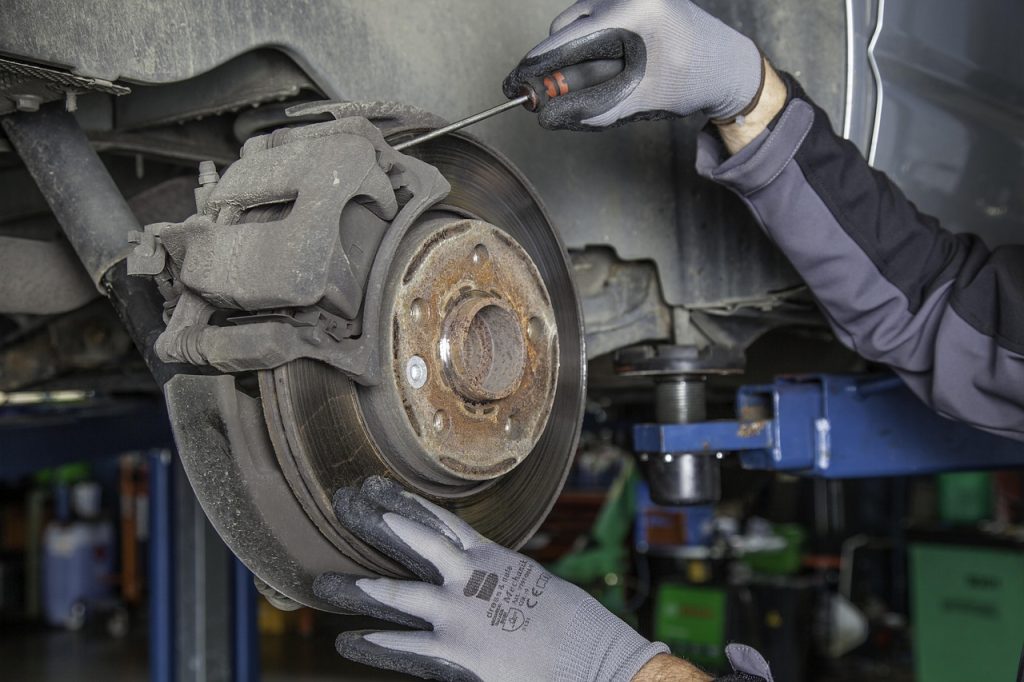
- Locate and Remove the Caliper: Find the brake caliper (the clamp-like part over the rotor). Use a socket to remove the two caliper bolts (usually on the back). Slide the caliper off the rotor— it may resist due to stuck pins, so gently pry with a flathead if needed. Hang the caliper from the suspension with a zip tie or bungee (don’t let it dangle by the hose).
- Remove Old Pads and Shims: Slide out the worn pads from the caliper bracket. Note their position (inner/outer) and remove any clips, shims, or retaining pins. Inspect the rotor for grooves or warping—if deeply scored, consider resurfacing or replacing it.
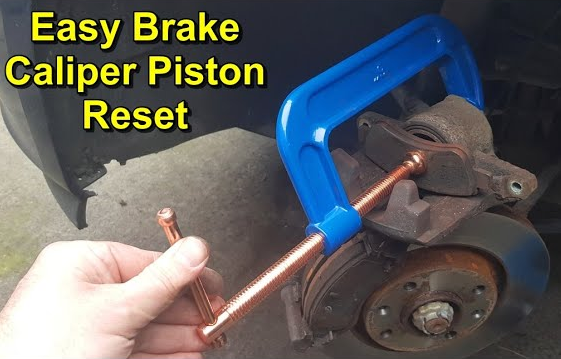
- Compress the Piston: Use a C-clamp to slowly push the caliper piston back into its bore (turn clockwise if it’s a screw-in type). This creates space for the thicker new pads. Spray brake cleaner on the bracket and rotor to remove dust and debris, then wipe dry.
- Install New Pads: Apply a thin layer of brake grease to the back of the new pads (where they contact the piston/shims) to prevent squeaks—avoid the friction surface. Slide the pads into the bracket, ensuring they match the old setup. Reinstall any shims or clips.
- Reassemble the Caliper: Slide the caliper back over the pads and rotor. Hand-tighten the bolts, then torque to spec (typically 20–30 ft-lbs for sedans). Reinstall the wheel, hand-tighten lugs, lower the car, and torque lugs in a star pattern (80–100 ft-lbs).
- Repeat on the Other Side: Mirror the process for the opposite wheel to ensure even braking.
- Bed In the Pads: After reassembly, pump the brake pedal until firm, then test-drive at low speeds (under 30 mph). Perform 8–10 moderate stops from 30 mph to heat-set the pads—avoid hard stops initially to prevent glazing.

Pro Tips for Sedan Owners
- For disc brakes (standard on most sedans), this covers 80% of jobs; drum brakes in rears are more involved and often shop-worthy.
- Upgrade to low-dust pads if city driving is your norm—they keep your rims cleaner.
- Check brake fluid levels post-job and top off if low, but flush if contaminated.
- Track mileage: Rotate tires every 5,000 miles to extend pad life.
If vibrations persist or your sedan has electronic parking brakes, grab a model-specific video or consult a mechanic. Safe wrenching—your brakes deserve the best!