Rotating your tires is an essential maintenance task that promotes even wear, extends tire life, and improves handling and safety. Most manufacturers recommend rotating every 5,000-8,000 miles or during oil changes. The method below uses your vehicle’s factory (OEM) scissor or bottle jack, lug wrench, and spare tire (assuming it’s full-sized and matches your tires; if it’s a donut spare, this may not work well—check your manual). This approach lifts one corner at a time and uses the spare as a temporary “placeholder” to facilitate swaps without needing multiple jacks or stands, though jack stands are highly recommended for safety. It’s suitable for most cars, trucks, or SUVs, but consult your owner’s manual for vehicle-specific jack points, torque specs (usually 80-100 ft-lbs for lug nuts), and rotation patterns. Work on a flat, level surface like a driveway, and never get under the vehicle while it’s only on the jack.
Tools and Materials Required
- OEM jack (scissor or bottle type from your vehicle)
- Lug wrench (often included with the jack kit)
- Full-sized spare tire (must be inflated to proper PSI, typically 32-35 PSI; check door jamb sticker)
- Wheel chocks or blocks (e.g., bricks or wood; essential for safety)
- Torque wrench (optional but recommended for final tightening)
- Gloves and safety glasses
- Optional: Jack stands (2-4 for added safety; never rely on the jack alone for support)
Safety Tips
- Park on level ground, engage the parking brake, and turn off the engine.
- Chock the wheels opposite the one you’re lifting (e.g., chock rear wheels when lifting front).
- Loosen lug nuts slightly (about 1/4 turn) before jacking to avoid spinning wheels in the air.
- Never exceed the jack’s weight rating or use it on soft ground.
- If using jack stands, place them under approved frame points and lower the vehicle onto them.
- After rotation, drive a short distance and re-torque lug nuts to prevent loosening.
- If unsure, consult a professional—improper jacking can damage your vehicle or cause injury.
Choose Your Rotation Pattern
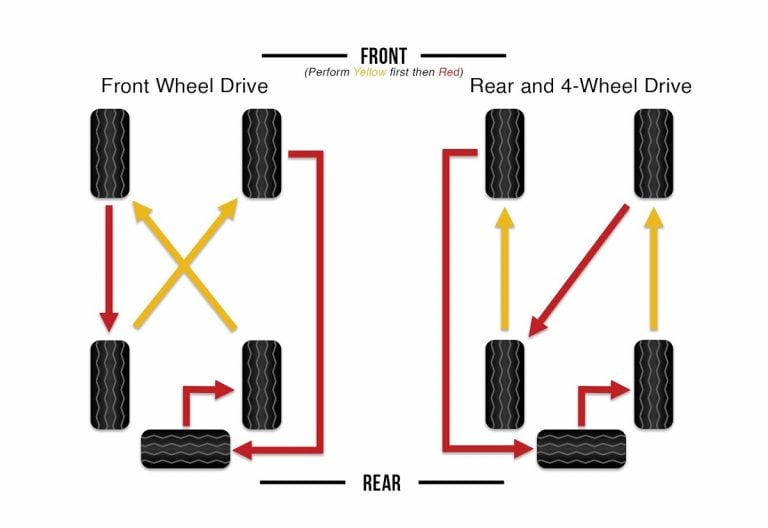
The pattern depends on your drive type (FWD, RWD, AWD/4WD) and tire type (directional vs. non-directional). For vehicles with a full-sized spare, you can include it in the rotation for even wear. Common patterns:
- Forward Cross (Recommended for FWD): Rear tires move straight to front (same side); front tires cross to rear; spare replaces a rear tire and cycles in.
- Rearward Cross (Recommended for RWD/4WD/AWD): Front tires move straight to rear (same side); rear tires cross to front; spare cycles similarly.
- Straight Swap (For Directional Tires): Swap front and rear on the same side only; spare not typically included.
Refer to your manual for the exact pattern—e.g., for many sedans, it’s a cross pattern; for trucks, it may include the spare.
Step-by-Step Instructions (Estimated Time: 30-60 Minutes)
This method rotates tires one or two at a time using the spare as a “bridge” to move tires around. Start with the driver’s side for convenience. Assume a rearward cross pattern for RWD/AWD (adjust as needed).
- Prepare the Vehicle: Park on flat ground, set the parking brake, and chock the wheels not being worked on. Loosen the lug nuts on all four tires (don’t remove yet). Locate jack points in your manual—usually pinch welds or frame rails near each wheel.
- Jack Up the First Corner (e.g., Rear Driver’s Side): Place the jack under the approved point for that wheel. Pump to lift until the tire is off the ground (about 1-2 inches). Remove the lug nuts and wheel.
- Install the Spare Temporarily: Mount the spare tire on the hub and hand-tighten the lug nuts. Lower the jack and remove it. (The spare now holds that position.)
- Move to the Next Corner in Sequence (e.g., Front Driver’s Side for Cross Pattern): Jack up this corner. Remove the tire and set it aside. Now, remove the spare from the previous corner (you may need to jack that corner briefly if needed, but usually not). Install the removed tire from this corner onto the previous position. Then, put the spare on this new corner and lower.
- Continue Swapping: Repeat for the remaining corners, using the spare as a “bridge” to move tires around. For example:
- Rear left tire moves to front left.
- Front left tire moves to rear right (via spare temp).
- Rear right to front right.
- Front right to rear left. If including the spare permanently, it ends up in one of the rear positions.
- Final Installation: Once all tires are in new positions, go around and fully tighten lug nuts in a star pattern (hand-tight first, then with wrench). If using a torque wrench, tighten to your vehicle’s spec.
- Test and Clean Up: Remove chocks, start the engine, and drive slowly to check for vibrations. Re-torque lugs after 50-100 miles. Store the jack and tools properly.
If your vehicle has TPMS (tire pressure monitoring), reset it per the manual. For directional tires (arrows on sidewall), ensure they face the correct way—may limit patterns to front-rear swaps. If you have jack stands, use them after lifting for extra safety during swaps. This method works for most vehicles but may vary—e.g., for trucks like Jeeps, check for skid plates blocking jack points. If uncomfortable, visit a tire shop (often $20-30).